Using LDAP withEktron CMS400.NET
Note: Active Directory and LDAP are not the same. While they perform similar functions, LDAP (when used with Ektron CMS400.NET) only verifies login information and creates the user in the everyone group. Active Directory can verify user login information only, or become completely integrated with Ektron CMS400.NET. To learn more about using Active Directory with Ektron CMS400.NET, see Active Directory Feature.
Enabling LDAP
You enable LDAP through the Active Directory Setup screen. To enable the LDAP functionality in Ektron CMS400.NET, follow these steps. See Also: The Active Directory Setup Screen
Warning! Before enabling LDAP in Ektron CMS400.NET, make sure your LDAP server is ready for use. Be sure to include an Ektron CMS400.NET administrator account for yourself.
After you enable LDAP, only the BuiltIn account can access Ektron CMS400.NET without LDAP authentication. See Also: BuiltIn User
1. In the siteroot\web.config file, change the ek_AUTH_Protocol property to GC.
<add key="ek_AUTH_Protocol" value="GC"/>
2. In the Workarea, navigate to the Settings > Configuration > Active Directory > Setup.
3. Click Edit ( ).
).
4. On the Active Directory Setup screen, check Enable LDAP Authentication.
5. Complete the following fields.
|
Field |
Description |
For more information, see |
|
Type |
Choose the type of LDAP authentication you are using. Note: Depending on your choices, the fields below may be required or disallowed. The following choices are available: Active Directory (LDAP) - Domain allowed, Organization is not. Novell eDirectory/NDS - Organization allowed, Domain is not. Sun Iplanet/JSDS - Domain allowed, Organization is not. Other - Allows Domain and Organization |
|
|
LDAP Server |
The IP address or name of the LDAP server. |
|
|
Port |
The LDAP server port with which Ektron CMS400.NET communicates. If you are unsure, consult the documentation provided with your Directory Service (such as, Novell, iPlanet, Microsoft, or Red Hat). |
|
|
Organization |
The name of your company or organization. For example, Ektron, Inc. You can leave this field blank if you enter a domain in the Domain field. |
|
|
Domain |
Your domain name. For example, www.ektron.com. This should be the name you used when purchasing your license key. You can leave this field blank if you enter an organization in the Organization field. |
|
| Attribute | Enter the key value used to reference accounts inside LDAP. As examples: dn, sn, cn, uid, etc. | |
| Use SSL | Check if you want to enforce a secure connection in traffic to the LDAP server. | |
|
Path |
The next levels below your Organization or Domain. These can include multiple levels of Organizational Units. For example, Content Editors, Marketing, East Coast. |
|
|
Add |
Enter the path to which you would like access in the text field. Then click the Add link. When adding Organizational Units, paths are comma-separated and run from specific to general. For example, ou=Amherst,ou=New Hampshire,o=US. Do not add individual Common Names here. Only add Organizational Units that contain people who should have access to Ektron CMS400.NET. Warning! You can add additional Organizations below an Organization Units as long as the path on your LDAP server is the same. |
Adding an Organizational Unit During Setup
To add a single individual from a different Organizational Unit, see Adding User Information from an LDAP Server to Ektron CMS400.NET |
6. Click Save ( ).
).
Using Active Directory for LDAP
1. In the webroot\siteroot\Web.Config file, add the Username and Password for ek_ADUsername and ek_ADPassword. For example:
<add key="ek_ADUsername" value="[email protected]" />
<add key="ek_ADPassword" value="mypasswordisthis" />
2. When using LDAP to connect to Active Directory, use the following settings in the Active Directory Setup screen.
|
Field |
Needed Information |
|
Type |
Active Directory (LDAP) |
|
LDAP Server |
[IP Address of the AD domain controller] |
|
Port |
389 |
|
Organization |
[leave this blank] |
|
Domain |
[dns name of the AD domain] For example: intra.ektron.com |
|
Organizational Unit |
[any OUs that you want to draw users from] For example: Support,Users,Ektron Corporate also Engineering,Users,Ektron Corporate |
Adding an Organizational Unit During Setup
Things to consider when adding Organizational Units.
Should everyone in the OU have access to Ektron CMS400.NET?
Once LDAP is enabled, users are added to the everyone group upon login. While everyone in the OU has access to Ektron CMS400.NET, every user should not necessarily have permission to edit content. To control permissions, set up user groups, add users to groups, and assign permissions to the group. See Also: Managing Users and User Groups and Folder Permissions
Do users in other Organizational Units need access?
Sometimes, managers or editors are in a different OU. They need to be added manually, or you need to add their OU.
When adding an Organizational Unit, several entries might cover the same hierarchical path. For example, you might have:
- ou=Pitchers,ou=Players,o=Team
- ou=Players,o=Team
- o=Team
This allows you to authenticate users listed in Pitchers, Players, and Team.
Adding User Information from an LDAP Server to Ektron CMS400.NET
Users at each level are automatically available for adding to Ektron CMS400.NET. You do not have to be at the OU or CN level to add a user. If a user is at the DC or OU level, they are available.
After LDAP is enabled, there are four ways to add LDAP user information to Ektron CMS400.NET.
The user logs in. As a result, the user appears in the Users list and is added to the Everyone group.
Note: After a user logs in, some fields on the Add User screen can be filled in manually, such as first and last name. For a description of these fields, seeManually Adding an LDAP User
Search an LDAP server for LDAP users. See Also: Searching an LDAP Server for Users
Add the user’s LDAP information manually. See Also: Manually Adding an LDAP User.
A combination of searching and manually completing the remaining fields. See Also: Using the Browse Feature to Add an LDAP User
Searching an LDAP Server for Users
The following steps explain how to search for a user on an LDAP server, and add the user to Ektron CMS400.NET.
1. Enable LDAP by following the instructions in Enabling LDAP.
2. From the left side of the Workarea, click Users.
3. Click Add Users (
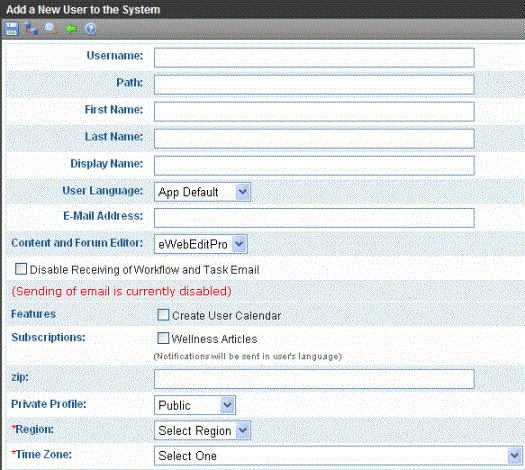
4. The Add a New User to the System screen appears.

5. Click Browse LDAP ( ).
).
6. The Search LDAP Users screen appears.

7. Enter one or more search criteria.
Username - the username of the user on the LDAP server
Firstname - the first name of the user on the LDAP server
Lastname - the last name of the user on the LDAP server
Path - select a path from the drop down list. These are the paths that were enabled when you configured Ektron CMS400.NET for your LDAP server. If you select a path and enter no other information, you get all users in that path.
8. Click Search.
9. The search returns users that match the criteria entered.
10. Check the box next to the user to be added.

11. Click Save ( )
)
12. The user is now added to Ektron CMS400.NET and the Everyone group. To learn how to assign the user to another user group, see Assigning Users to User Groups.
Manually Adding an LDAP User
The following steps explain how to add an LDAP user manually.
1. Enable LDAP by following the instructions in Enabling LDAP.
2. From the left side of the Workarea, click Users.
3. Click Add Users (
4. The Add a New User to the System screen appears.

5. Fill out the fields according to Creating a New User.
6. Click Save ( ).
).
7. The View Users in Group Everyone screen appears, displaying the new user and the other Ektron CMS400.NET users. To learn how to assign the user to another group, see Assigning Users to User Groups.
Using the Browse Feature to Add an LDAP User
The Browse LDAP feature provides a friendly and intuitive way to find the username, domain/organization and organizational unit(s).
Warning! The default server IP/DNS name and port are taken from the settings specified in the Configuration > Setup page. These settings must be specified before connecting to the LDAP server. See Also: Enabling LDAP
Warning! Before using the browse feature, you must specify an Organizational Unit that can see the user in the Configuration > Setup page. See Also: Enabling LDAP
1. Enable LDAP by following the instructions in Enabling LDAP.
2. From the left side of the Workarea, click Users.
3. Click Add Users (
4. The Add a New User to the System screen appears.

5. Click Browse LDAP ( ).
).
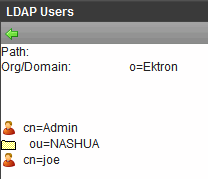
6. The LDAP Explorer appears.

7. Navigate the LDAP server’s folders by clicking on the folder images. Each folder represents an Organizational Unit (OU). When you choose an OU level, its users appear.
Note: In the LDAP Explorer, the Path and Org/Domain fields update dynamically as you navigate through the LDAP tree.
8. Select a user.
9. The user is added to Ektron CMS400.NET and the Everyone group. To learn how to assign this user to another group, see Assigning Users to User Groups.
Editing User Information in Ektron CMS400.NET
It is important to note that Ektron CMS400.NET does not write to the LDAP server. So, while you can change fields when editing a user in Ektron CMS400.NET, you also need to make the same changes on the LDAP server.
Steps to Edit an LDAP User’s Information
The following steps explain how to edit an LDAP user’s information.
1. In the Workarea, click Settings > Users.
2. In the Username column, click a user to edit.
3. The View User Information screen appears.
4. Click Edit ( ).
).
5. Change the information as needed. For more information on the fields you can edit, see Creating a New User.
6. Click Save ( ).
).
Deleting Users
If a user is deleted on the LDAP server, Ektron CMS400.NET does not automatically delete the user. However, the user’s login fails because he cannot be authenticated.
In this case, you should delete the user from Ektron CMS400.NET using the Delete User function. See Also: Deleting a User
Note: If you mistakenly delete all users with administrative privileges, you can still sign in using the builtin user’s username and password. For more information, see ”BuiltIn User” on page 19-11.


